We, humans, realize through the sense of touch when we come into contact with an object. Then we can respond accordingly. Computers and machines do not have such abilities. Hence, engineers developed touch sensors to enable the devices to respond as required. Consequently, touch sensor has found their way into almost all our devices, such as mobile phones, cars, and many more. Moreover, touch sensors have entirely replaced many mechanical gadgets.
In this article, you will learn all there is to know about touch sensors: how they work, the different types of touch sensors, and how to make a touch sensor.
Contents
- What is a Touch Sensor?
- How Does a Touch Sensor Work?
- Types of Touch Sensors
- Capacitive touch sensor
- Resistive touch sensor
- Infrared touch sensor
- Surface acoustic wave (SAW) touch sensor
- Touch Sensor Circuit: How to Make a Simple Touch Sensor
- Materials you require
- Procedure
- Arduino Touch Sensor Guide
- Materials you will need
- Procedure
- Touch Sensor Applications
- Conclusion
What is a Touch Sensor?
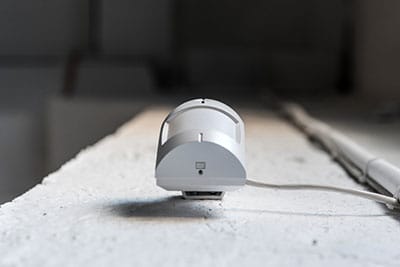
Touch sensors, also known as tactile sensors, are inexpensive and straightforward sensors used to detect and record physical touch.

A touch sensor
System designers prefer touch sensors as they provide many design options, offer enhanced user interfaces, and are more reliable.
In addition, touch sensors have a more ultra-modern and appealing look.
How Does a Touch Sensor Work?
A touch sensor works similarly to a regular switch. In that, when there is pressure or contact on the touch sensor's surface, the circuit in the sensor closes, and current flows.

Touch screen mobile phone
On the other hand, once you remove the pressure or the contact, the circuit opens, and there is no current flow.
The circuit diagram below illustrates how a touch sensor works.
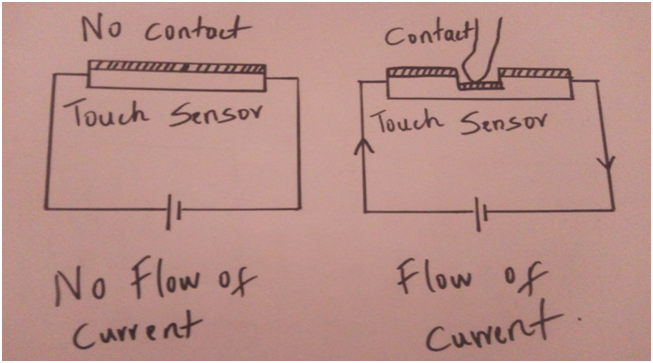
Touch sensor circuit diagram
Special Offer: Get $100 off your order!
Email sales@ourpcb.net to get started!
Types of Touch Sensors
There are four types of touch sensors. Namely:
- The Capacitive touch sensor
- Resistive touch sensor
- Infrared touch sensor
- Surface acoustic wave (SAW) touch sensor
Let us have a closer look at each.
Capacitive touch sensor
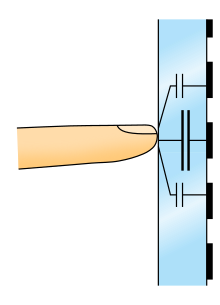
Capacitive touch sensors calculate touch depending on the electrical disturbance realized from the change in capacitance.
The Capacitive sensing
Source: Wikipedia
To make a capacitive touch sensor, engineers place a transparent electrode layer atop a glass panel and cover it with a protective coating.
How a capacitive touch sensor functions
When a conductive material nears the electrodes sensor, the printed circuit panel initiates an electrical charge throughout the surface. (The same process occurs when there is physical contact on the glass panel)
As a result, there will be a reduction in the capacitance, enabling the system to establish where the touch occurred.
The system may detect a touch in multiple areas, enabling spread and touch pinch in some cases.
In a capacitive touch sensor, conductive materials such as moisture and water can lead to unintended or false triggers.
Thus, engineers use software algorithms or more sensing pads to differentiate false and intended touch with the capacitive touch sensor.
Capacitive touch sensors fall into two categories:
Surface capacitive sensing—where engineers apply a conductive coating on one side of the surface of an insulator. They then use current on the whole conductive layer.
When contact occurs on the surface, there is the formation of capacitance between the conductive coating and the insulator. Thereby drawing current from all the corners.
The IC measures current from each corner to determine the touch location on the surface.
Projected capacitive sensing—where engineers place a conductive material in the middle of two insulators such as gold, copper, or indium tin oxide. The engineers then use an IC to monitor the grid.
The IC will then calculate the place touched when contact with the conductive material occurs.
A capacitive displacement sensor
Source: Wikipedia
Advantages
- Highly responsive
- Supports multi-touch
- It doesn't need the pressure to function
Disadvantages
- Susceptible to abrasion
- Can't work with gloves or a stylus
- Unreliable in harsh environments
Resistive touch sensor
A resistive touch sensor establishes touch in response to the pressure applied on the surface.
Resistive touch sensors constitute a pair of conductive layers separated by an insulating material.
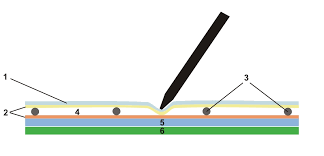
Resistive touch screen
Source: Wikipedia
How it works
When applying pressure on the surface, the exterior conductive layer pushes on the inner layer, changing voltage.
Next, there will be a comparison between the starting voltage and the voltage change enabling the system to locate where the touch occurred.
Unlike capacitive touch sensors, resistive touch sensors don't support multi-touch.
Resistive touch sensors fall into three categories:
4- Wire resistive touch sensors, which are the most affordable.
5-wire touch sensors enable more actuation, and they share similar features with a 4- wire sensor, apart from having electrodes in the lower layer.
8- Wire resistive touch sensors are the most efficient.
Advantages
- Cost-effective
- Long-lasting
- Easy to use
- Reduced power consumption
- Can work with stylus and gloves
- Faster response time
Disadvantages
- Lacks multi-touch ability
- Highly dependent on pressure to function
Infrared touch sensor
Unlike the other touch sensors, infrared touch sensors don't cover the display with an additional screen.
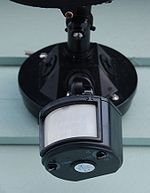
Passive infrared sensor
Source: Wikipedia
On the contrary, infrared monitors utilize receivers and IR emitters to generate unseeable light beams throughout the screen.
Hence physical contact on the inconspicuous light beam (touch status) enables the sensors to locate where the touch occurred.
Advantages
- Limitless touch life
- Not affected by surface scratches
- Best image clarity compared to other sensors
Disadvantages
- Prone to false activation
- Expensive
- Susceptible to water, snow, and rain
Surface acoustic wave (SAW) touch sensor
SAW touch sensors employ piezoelectric transducers with receivers on the monitor's glass plate. They do so to establish microscopic ultrasonic waves on the glass surface.
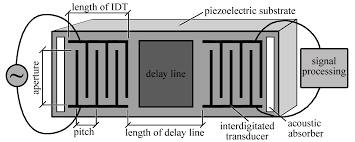
Surface acoustic wave sensor transducer diagram
Source: Wikimedia Commons
When you touch the panel, you absorb a portion of the wave, enabling the transducer to receive the data and locate the touchpoint.
You can activate a surface acoustic wave sensor using a stylus, fingers, or gloved hand.
Advantages
- Outstanding image quality
- Long touch life
- Improved scratch resistance
Disadvantages
- Hard items such as pens or a fingernail will not activate the sensor.
- Water may lead to false triggering.
- Materials on the screen may lead to non-touch spots until you remove them.
Touch Sensor Circuit: How to Make a Simple Touch Sensor
Materials you require
- An LED
- A transistor
- A resistor
Procedure
Firstly, link the resistor and LED in series to the transistor's collector. Ensure you use a resistor setting your LED's current to about 20 mA.
Secondly, attach the transistor to the supply's negative terminal.
Thirdly, fabricate two wires, confirming they have exposed ends.
Finally, connect one wire to the positive supply and the other to the transistors' base.
You can now touch the two wires with your fingers to see the LED glow.
Here is a circuit diagram you can follow for direction

Touch sensor circuit diagram
Arduino Touch Sensor Guide
Materials you will need
- Seeeduino V4.2
- Grove base shield
- Grove 12- key Capacitive 12C Touch Sensor V2
Procedure
Link the MPR121 or Grove 12- key Capacitive 12C touch sensor V2 to the base shields I2C port.
Then place the grove base shield inside the Arduino link the Arduino to the PC using a USB cable.
Configuring the software
Download and install the Grove Touch sensor MPR121 library.
Next, restart your Arduino IDE and unlock the example by copying the code below to a new Arduino IDE sketch.
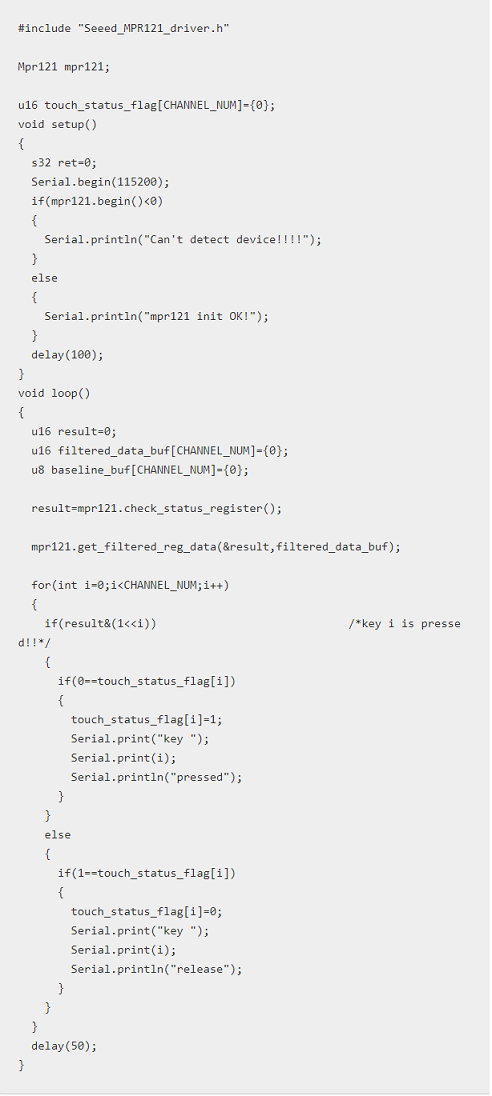
Finish by uploading the code, open the Arduino IDEs serial monitor and place the baud rate at 115200.
Assuming you do everything correctly when you press the CHO ~CH11 pads, you should get the results as shown below.

Touch Sensor Applications
- Touchpads
- Smartphones and portable devices
- Automotive and industrial applications

- Musical instruments
- Pressure and distance measurement
- Robotics touch sensors
- Kitchen faucet touch sensors
Conclusion
By the end of this article, we hope you can list the various types of touch sensors, their applications, advantages, and disadvantages.
Above all, remember to copy and paste the code exactly to get accurate results. You can also contact ourPCB for more information on the subject.
Special Offer: Get $100 off your order!
Email sales@ourpcb.net to get started!