Many different switches exist on the market, each providing unique characteristics for electronic circuit implementations. These generally open or close a circuit in specific applications, allowing them to operate as intended. For example, a simple switch may integrate into a washing machine, torchlight, etc. In that case, they can power on and off. Now, we will introduce the bi-directional switch. As the name suggests, it differs from a regular button due to the current flowing in both directions. By reading this article, you will gain more knowledge about a bidirectional switch and its capabilities. So let’s get started!
Contents
What is a Bidirectional Switch
A bidirectional power switch (BPS) is an active switch with bidirectional current flow capabilities when it operates. Otherwise, if it turns off, the device, called a four-quadrant switch, provides bidirectional voltage blocking. The BPS performs these operations through its MOSFETs or IGBTs implementation.
The BPS represents a traditional ON/OFF switch due to the current flowing in both directions. In this case, the switch’s point A (input terminal) receives a positive voltage. Meanwhile, point B receives a positive voltage, causing the current to flow from point A to B. The process can also reverse through voltage polarity switching.
A BPS device has applications in matrix converters and SSR designs with MOSFET implementations.
Special Offer: Get $100 off your order!
Email [email protected] to get started!
Features
A BPS system offers excellent reliability via circuitry protection against short circuits, inrush currents, overloads, and overheating. Thus, the device will remain safe when connected to a battery.
The device allows power to flow from points A to B and B to A. Its flexibility characteristic ensures that the path turns on when terminal B activates. Of course, this occurs even if terminal A receives no voltage.
A bidirectional switch can connect to a battery, improving voltage regulation.
Additionally, a simple bi-directional switch features low on-state resistance Ron for battery applications. As a result, voltage regulation improves.
Simple Bidirectional Switch Construction
A bidirectional switch circuit features MOSFETs or IGBTs connected in series from one end to the other. Also, these can configure in three different ways. For example, one configuration may consist of two P-channel MOSFETs connected back to back.
In another setting, two N-channel MOSFETs connect crosswise at each source, forming a BPS design. The third setup involves connecting two N-channel MOSFETs from one drain source to another. As a result, it provides bidirectional conductivity capabilities.
Circuit diagram:
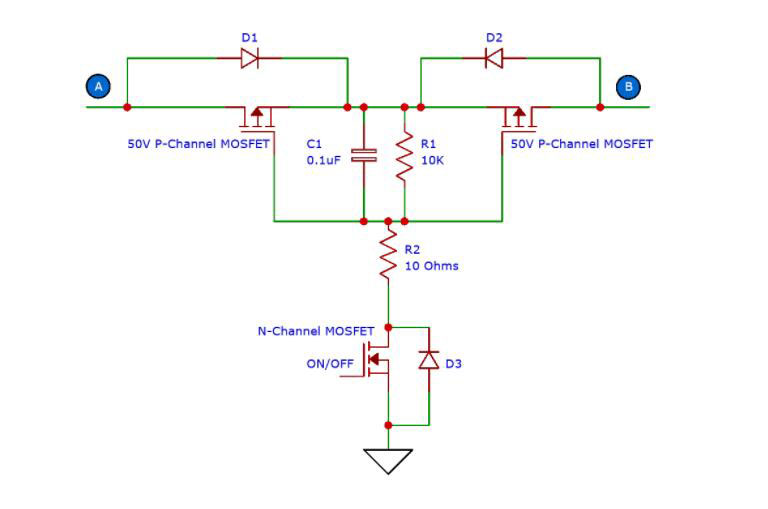 Bidirectional switch circuit diagram.
You will need the following components to build the bidirectional switch circuit:
- 50V P-Channel MOSFET – 2x
- N-Channel MOSFET – 1x
- External Diode – 3x
- 0.1uF Capacitor – 1x
- 10K Resistor – 1x
- 10 Ohms Resistor – 1x
- PCB – 1x
Steps:
Follow the steps below to create a directional switch:
Step one:
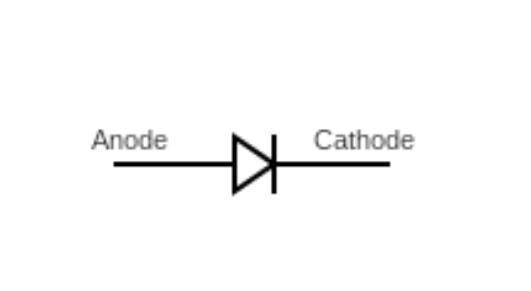
Diode symbol schematic.
First, add one 50V P-Channel MOSTEF on the circuit’s left side. Then, connect the D1 Diode’s anode terminal to the MOSFET’s drain pin. Meanwhile, the cathode terminal must connect to the MOSFET’s source pin. Afterward, add the second P-Channel MOSFET and click the first MOSFET’s source pin to the second MOSFET’s source pin.
Step two:
Next, add the D2 Diode, connecting the cathode terminal to the source pin. Then, click the anode terminal to the drain pin. After that, combine the first MOSFET gate pin with the second MOSFET gate pin. Then, integrate the C1 0.1uF capacitor and 10K resistor as shown in the circuit diagram.
Step three:
Lastly, add any N-Channel MOSFET to the circuit. You will then need to connect the R2 10 Ohms resistor to the N-Channel MOSFET’s drain pin. Then, click the D3 Diode’s cathode terminal to the N-Channel MOSFET’s drain pin. Meanwhile, the anode terminal connects to the source pin. Afterward, join the N-Channel MOSFET’s source pin to the ground.
Working principle:
Applying a positive voltage to point A sets the D1 Diode to a forward-biased and conductive state. Afterward, the gate voltage flows through the D2 Diode and continues to the right side P-MOSFET, making point B conductive.
Meanwhile, applying a positive voltage to point B will cause the forward-biased diode D2 to be in a conductive state. Additionally, the N-channel MOSFET provides ON/OFF switching capabilities for the BPS system.
Lastly, the capacitor and resistors protect the BPS device against the in-rush current surge.
Because of its extreme RDSon, a P-Channel MOSFET will generate more heat. Therefore, these can cause issues in a BPS system. Instead, these must feature more extensive and expensive devices compared to N-Channel MOSFET-based BPS systems.
Summary
Overall, a bidirectional switch device allows current flow from point A to point B in a circuit. Of course, this setting can reverse, which means either terminal receives voltage. In that case, it will not affect its overall performance. Not only that, but a bidirectional switch provides excellent circuitry protection against inrush current, short circuits, overloads, and overheating. You can even utilize the BPS system for battery applications to improve voltage regulation. You should note that a BPS device can consist of P-Channel and N-Channel MOSFETs, making it very easy to build!
Do you have any questions regarding the bidirectional switch? Feel free to contact us!
Special Offer: Get $100 off your order!
Email [email protected] to get started!