Touch lamp circuit make lamps look sleeker because they eliminate the need for flipping or pushing. Also, this touch mechanism is advantageous because it does not allow moisture or dirt to get in, like in a conventional lamp. Since we are more accustomed to using touch interfaces on mobile devices, it would be intuitive to incorporate similar switching mechanisms to lamps.
If you want to incorporate the touch mechanism into your lamp, this article looks at how to make a touch lamp circuit.
Contents
- How Does a Touch Lamp Work?
- How to Make a Touch Lamp?
- Touch Lamp Control Dimmer
- Touch Lamp Circuit using NE555 Timer
- Touch Lamp Circuit using a Single MOSFET
- Touch Lamp Circuit using Arduino
- Making a Lamp Into a Touch Lamp
- Troubleshooting Various Touch Lamp Problems
- Touch Lamp Does Not Work
- Touch Lamp Flickers
- Touch Lamp Does Not Turn Off
- Touch Lamp Ap
- plications
- Summary
How Does a Touch Lamp Work?
Touch lamps are sensitive to human touch and can use one of the following human body properties for activation.
- Resistance: Since the body contains about 60% water, it is a good conductor of electricity. Therefore, your finger can connect two contact points placed close to each other.
- Temperature: The body is usually warmer than the surrounding air. Therefore, it is possible to create warmth-sensitive touch buttons.
- Radio reception: Human bodies are also good antennas, and some touch switches take advantage of this property. They look for a radio wave reception change, which occurs when you touch the sensor.
- Capacitance: Most touch-sensitive switches use this property. Capacitance is the capacity of a body to hold and store electrons. When you touch the sensor, your body adds its capacitance to the lamp, and the capacitive touch sensor touch circuit detects this difference.
These lamps usually have three brightness settings but without a three-way bulb. They achieve these settings by altering the duty cycle of the current flowing into the bulb. A bulb at full power gets a continuous power flow. However, turning on and off the power supply in rapid succession (at a rate of about 100 times a second) will make the bulb half as bright without noticeable flickering. This quick switching is the idea behind brightness adjustment in these lamps.

Table light lamp
How to Make a Touch Lamp?
Touch Lamp Control Dimmer
You need the following parts to make this circuit.
- A touch sensor
- TT6061A IC
- BT136 Triac
- Four capacitors (470nF and three 820pF)
- Two 25V polarized capacitors (1mF and 470nF)
- Zener diode
- Three diodes (two 1N4148 and one 1N4007)
- Seven resistors (two 1K, 620K, 40K, 1.5M, 6.8M, and 10K)
- Bulb

A touch lamp control dimmer circuit diagram.
The power supply circuit consists of R1, R3, ZD, D3, and C4. R1 and R3 limit the current flowing into the IC, while D3 and ZD rectify the AC. C4 acts as the filter capacitor. Therefore, the IC's pin 1 is the system frequency input pin.
On the other hand, line frequency goes through R4 to the IC's pin 2. The IC fires a pulse at zero crossing to trigger the Triac, and the width of the firing pulse depends on the number of touches sensed on the plate. Therefore, pin 2 is the input frequency input pin, and each touch varies the bulb's brightness.
R7 is the pull-down resistor for the Triac's gate, while capacitors C1-C3 provide isolation. You can use a 1cm square metal plate as the touch control terminal.
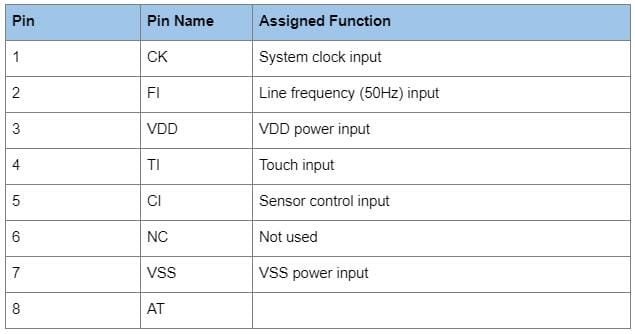
TT6061A Pin Assignment
Touch Lamp Circuit using NE555 Timer
- A touch sensor
- NE555 IC
- Two 1W LEDs
- One 2N6122 transistor
- Five resistors (1K, two 5.1M, and two 27 ohms)
- Step-down transformer (230-volt (or 110-volt) primary to 9-volt secondary 1-amp)
- Diode bridge
You can power the circuit using a 12-volt battery, as shown in the following circuit diagram.
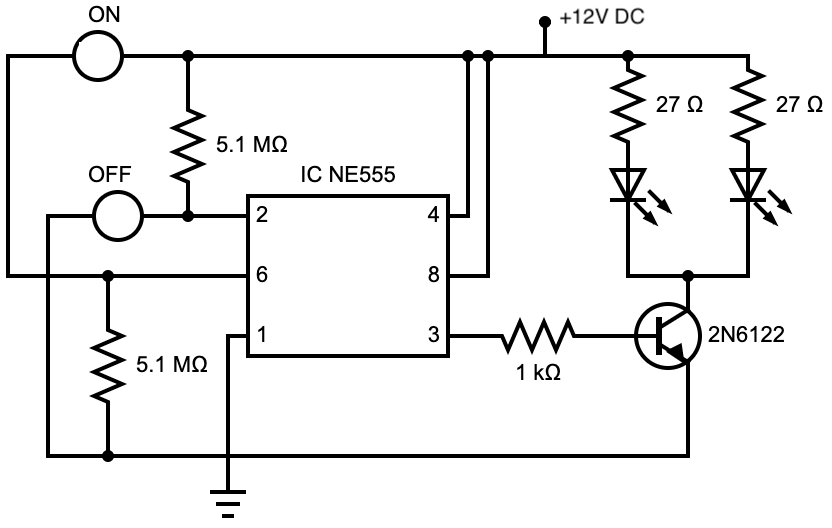
A DC-powered NE555 touch lamp circuit diagram
Alternatively, you can use a step-down transformer and diode bridge to lower the voltage and convert AC to DC to power the lamp.
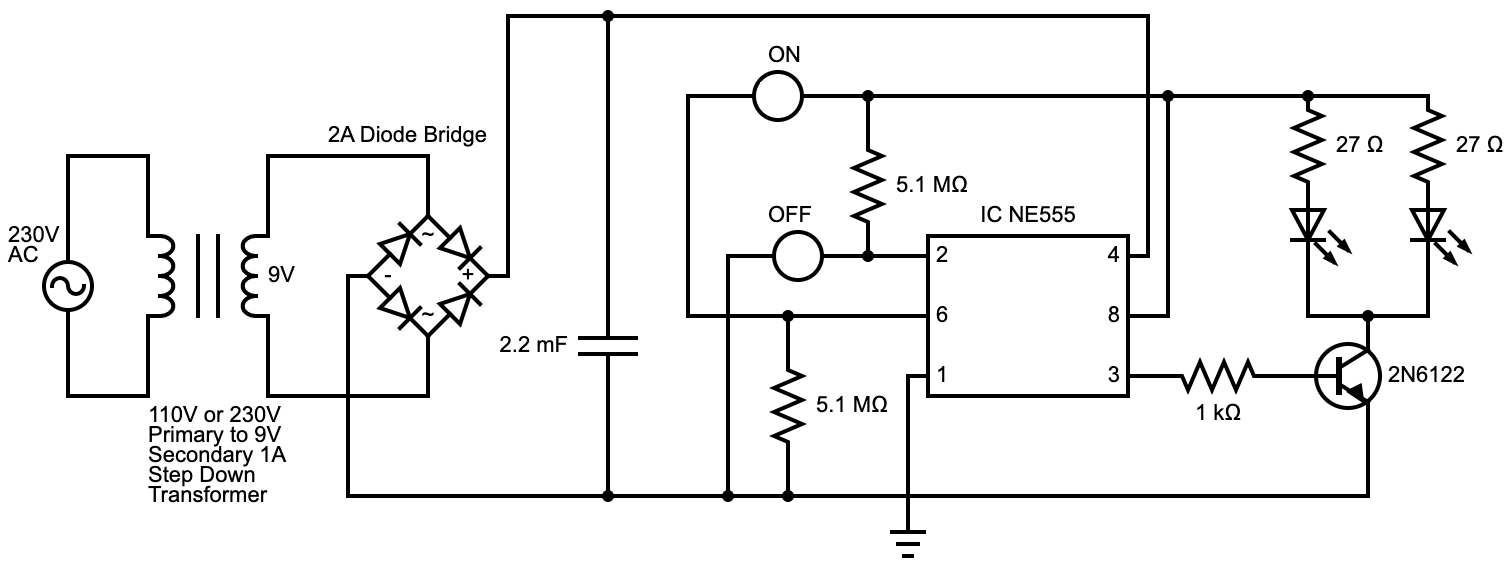
An AC-powered NE555 touch lamp circuit diagram
The heart of this circuit is the NE555, while the 2N6122 transistor functions like a switch. We have connected two LEDs in parallel, each with its 27-ohm resistor. You can add three or four more in parallel, each with its 27-ohm resistor. However, such a load requires a higher current and voltage capacity transformer, such as 2-3 amperes. Also, it requires a higher current diode bridge, such as 5 amperes.
Touch Lamp Circuit using a Single MOSFET
You need the following parts to make this lamp.
- A touch sensor
- A 2N7000 MOSFET
- Four resistors (22M, 10K, and two 1K)
- A BC237B NPN transistor
- One relay
- A 1N4148 diode
Make electrical connections, as shown in the circuit diagram below.
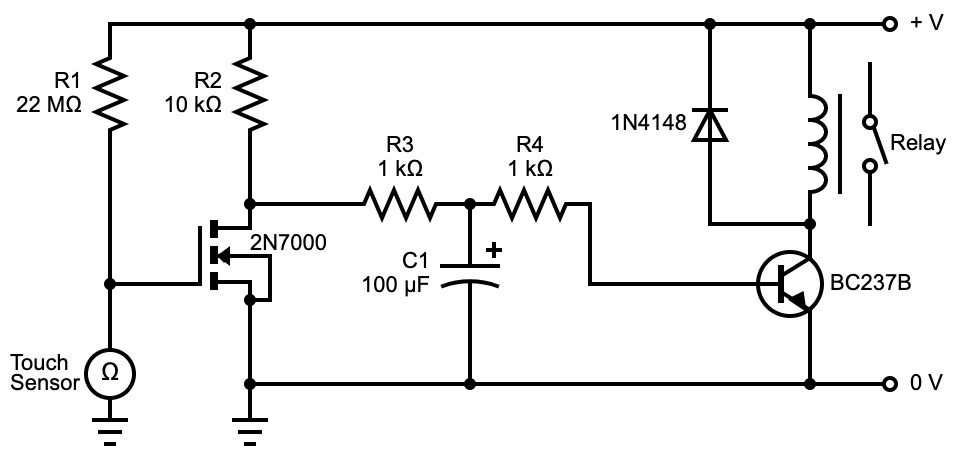
A touch lamp circuit diagram using a single MOSFET
The MOSFET remains on if there's no touch sensed on the sensor due to the positive voltage from R1. In this state, the base voltage to the transistor via R2 stays grounded due to the MOSFET drain. Therefore, the transistor and relay remain off.
However, when you touch the sensor, you ground the R1 voltage, turning off the MOSFET. In this state, the transistor accesses the voltage from R2 and turns it on. This powered transistor supplies the required voltage to turn on the relay and power any load connected to the contacts.
It is vital to note that the 22M resistor makes the touch terminal extremely sensitive. You can replace it with a 10M to reduce its sensitivity.
Touch Lamp Circuit using Arduino
You need the following components.
- Arduino UNO and IDE
- One 1M resistor
- Jumper wires
- LED
- Coin or aluminum foil
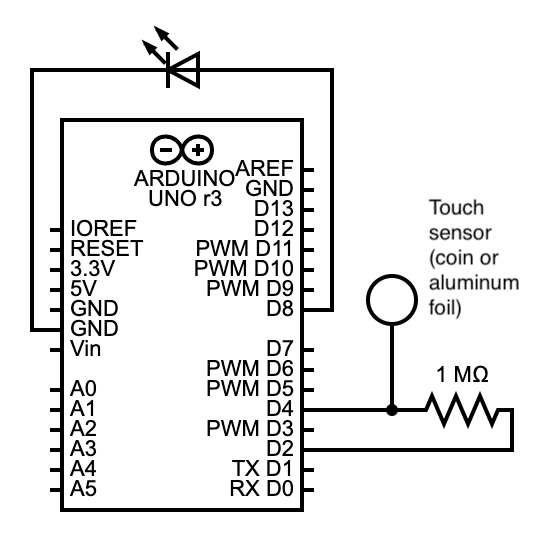
An Arduino touch lamp circuit diagram
The Arduino touch lamp is a simple resistor-capacitor circuit (the sensor acts as the capacitor). After making the electrical connections, write the following code and upload it to the board.
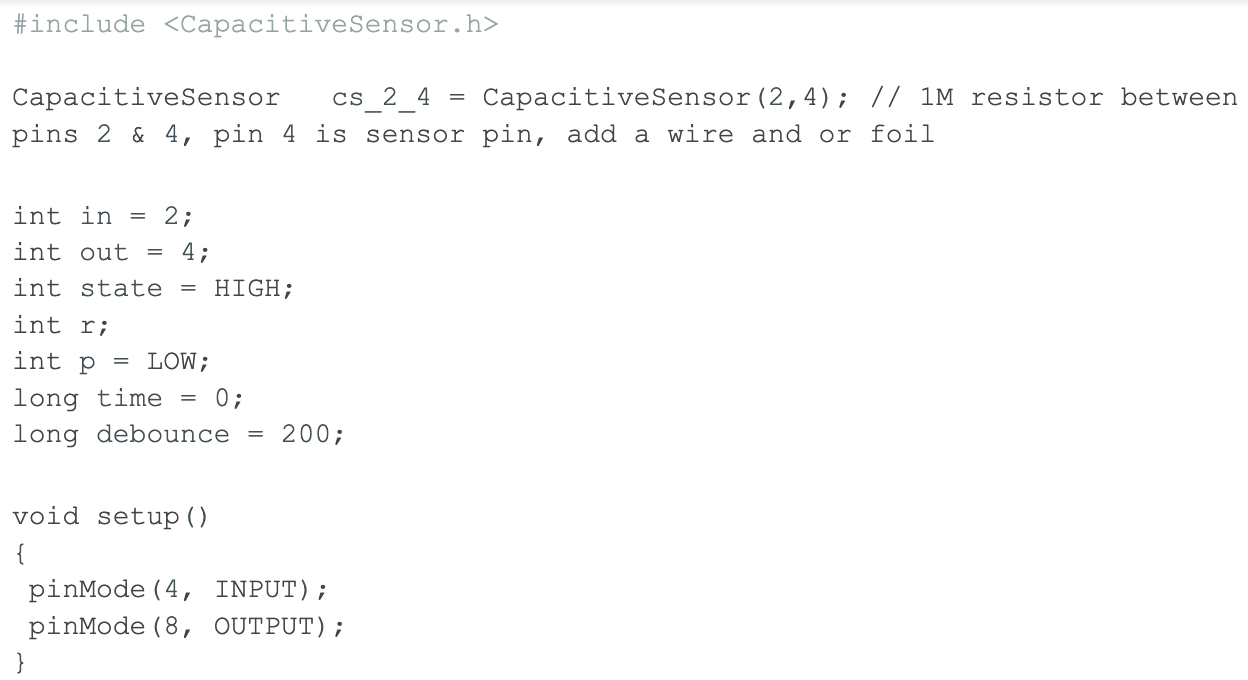

Please note that you should install the capacitive sensor library before uploading the code.
Once you run the code, the LED should change to the previous state (on or off). A larger resistor makes the sensor more sensitive. Therefore, you can try different sizes to suit your preferred sensitivity.
Making a Lamp Into a Touch Lamp
You can incorporate one of the above circuits into your ordinary lamp, replacing the push or flip switch with this touch switch.
Special Offer: Get $100 off your order!
Email sales@ourpcb.net to get started!
Troubleshooting Various Touch Lamp Problems
Touch lamps usually run smoothly, but some issues may arise from time to time. The most common problems include the following.
Touch Lamp Does Not Work
If the lamp stops working, it could be due to:
- A damaged cable or dead batteries: Pets can chew the cord. If it is cordless, the batteries can run out. Replace either of them to fix this issue.
- Outlet issues: The wall outlet can have problems. One way to find out is to plug in another appliance and see if it works. If it works, the lamp is faulty. Otherwise, the outlet is defective. You can also connect the lamp to another outlet to troubleshoot this issue.
- Damaged light bulb: Check the light bulb filament and replace it if broken.
- Touch control, wires, or socket wiring issues: Some problems can come from inside the lamp. You need to disassemble the unit, check the wiring and possibly replace the touch control.
Touch Lamp Flickers
A touch lamp usually blinks when the power usage of another appliance messes up the lamp's sensors. In technical terms, flickering occurs when your lamp reacts to the electrons of another device.
You can solve this problem by moving the lamp or appliance to another electrical circuit to eliminate the interaction. Alternatively, you can move the touch lamp away from the air of the motion that causes it to flicker.

Woman Fixing Lamp
Touch Lamp Does Not Turn Off
Touch control boxes don't last forever, and defective units can prevent the lamp from turning off even after turning the switch manually. Power surges can also damage the touch control, keeping the bulb in a permanently on or off state. You can solve this issue by replacing the touch control box.
Touch Lamp Ap
plications

- LED table lamp
- Reading lamp
- Bedside lamp
- Portable emergency light
Summary
In conclusion, there are different touch lamp circuit designs, but all achieve one objective. You can use these layouts to build new touch-sensitive lamps or upgrade your regular lamp to have this modern switch. If you need the circuit for your project, we can assemble it for you at reasonable prices. Just leave a message in the contact section, and we'll get back to you asap.
Special Offer: Get $100 off your order!
Email sales@ourpcb.net to get started!