Build Arduino-based projects. As such, you must familiarize yourself with Arduino’s various libraries and its data types. The Software Serial Arduino(SoftwareSerial) package is one such library. This guide will explore some of its usages and why it will be a crucial part of your future Arduino projects.
Contents
- What is the Arduino Software Serial Library?
- What is the Difference Between a Hardware Serial and Software Serial?
- How to use Arduino Software Serial?
- Import The Arduino Software Serial Library
- Create and Initiate Software Serial Object
- Call a Method on The Software Serial Object
- Arduino Software Serial Example
- Limitations of Software Serial Arduino
- FAQ
- Does Arduino store serial data?
What is the Arduino Software Serial Library?
Most Arduino microcontrollers have native hardware support for serial and digital communication. However, certain Arduino microcontrollers may not have enough hardware-based serial pins to support full serial communications. Thus, we need a way to get around this limitation. This is where the Arduino Software Serial Library comes in.
It allows you to use the Arduino microcontroller’s non-serial (digital) pins to make serial communications. Accordingly, you can use it to interface with Arduino’s Serial Monitor.
What is the Difference Between a Hardware Serial and Software Serial?
Hardware serial describes communication that the Arduino microcontroller performs through its physical serial pins. Contrastingly (but similarly), Software Serial performs serial communication through the microcontroller’s digital pins. However, the Software Serial library may also use the microcontroller’s serial pins.
Special Offer: Get $100 off your order!
Email [email protected] to get started!
How to use Arduino Software Serial?
Import The Arduino Software Serial Library
Firstly, you need to import Arduino’s Software Serial library. You can fulfill this action by including the following tag in your code:
#include <SoftwareSerial.h>
Create and Initiate Software Serial Object
Next, you need to create and initiate a SoftwareSerial object. The SoftwareSerial constructor takes three arguments (but only requires two) for its parameter list. It accepts rxPin, txPin, and inverse_logic as values. Accordingly, the constructor’s structure is as follows:
SoftwareSerial(rxPin, txPin, inverse_logic)
By default, inverse_logic is false and thus, the function does not require you to set it. Incidentally, the inverse logic parameter reverses the logic of incoming and outgoing bits.
Call a Method on The Software Serial Object
Finally, once you’ve successfully created a SoftwareSerial object, you can then use the SoftwareSerial object to call one of the following methods:
- available(): Finds the number of bytes available to read from the software serial port. Essentially, it checks the serial receive buffer for data that has already received and stored.
- Begin (): Sets the baud rate. Incidentally, valid baud rates can range from 300 to 115200.
- Listening (): Validates that the Software Serial object is currently and actively listening.
- Overflow (): The software serial buffer can hold up to 64 bytes. However, it can tend to overflow and throw an error. Thus, it’s good to use the overflow method to check if the software serial buffer has overflowed. Furthermore, this method clears the overflow flag. Therefore, subsequent calls to it will return false.
- Read (): Fetches a character that the RX pin of the SoftwareSerial object just received.
- Peek (): Works similarly to the read method. However, it will always retrieve the same character every time the SoftwareSerial library object calls it.
- print(): Writes data (characters) to the SoftwareSerial object.
- println(): Works similarly to the print() method. However, it includes a carriage return and line feed at the end of the data stream.
- Listen (): You can create multiple SoftwareSerial objects in your code. However, it’s important to note that only one Serial object can listen for and receive data at a time. Thus, you must use the listen() method to identify which.
- Write (): Writes data to the TX pin of the Software Serial object. However, it writes them in the form of raw bytes.
Arduino Software Serial Example
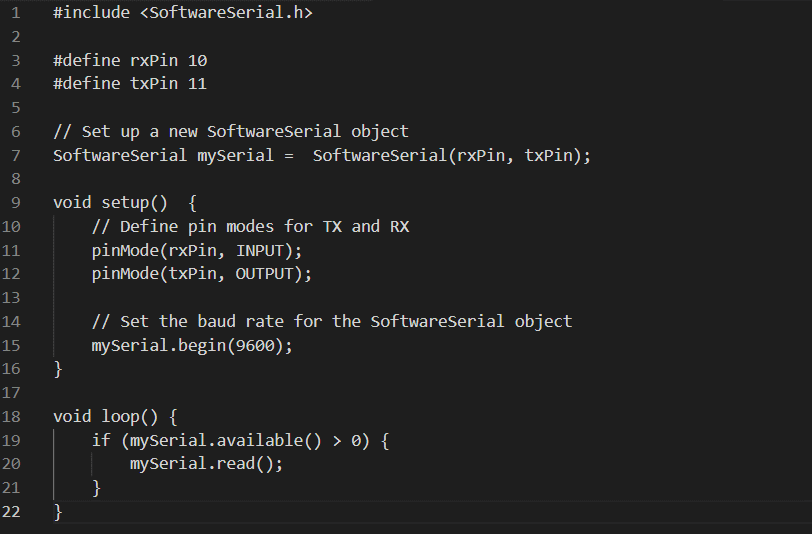
You can find a copy-able version of the above code from this JustPaste. It link.
First, the above code defines which pins Arduino Software Serial will use for receiving data (rxPin) and transmitting data (txPin). Secondly, it then uses these variables to construct a SoftwareSerial object.
Next, it sets the pin modes (rxPin as input and txPin as output). Finally, it sets the baud rate using the begin method and then waits for input from the Arduino Serial Monitor using the read() method.
Limitations of Software Serial Arduino

By creating a project with Arduino and a laptop.
The Software Serial library has a few limitations, including:
- Only one digital/serial port can receive data at a single time in instances where you are using multiple software serial pins.
- The Software Serial library does not support Pin 13 on the Arduino 101 and Genuino 101 RX.
- Only certain pins have RX support for the Arduino Mega and Mega 2560. Incidentally, this limitation is due to a lack of change interrupt support. Proportionally, these pins are:
- 10 – 15
- 50 - 53
- A8 - A15
- Again, only certain pins have RX capabilities on the Arduino Leonardo and Micro due to change interrupt support. Appropriately, these pins are:
- 8-11
- 14 (MISO)
- 15 (SCK)
- 16 (MOSI)
- The Arduino 101 and Genuino 101 have maximum current RX speed limitations of 57600 bps.
FAQ

Image of code on a screen
Does Arduino store serial data?
Special Offer: Get $100 off your order!
Email [email protected] to get started!