Raspberry Pi boards have become necessary tools for industrialists, hobbyists, students, etc. But their primary disadvantage over rivals like Arduino and ESP32 is cost; Pi boards are expensive.
However, this changed when the foundation released the Pico board. It is an affordable microcontroller board, and we have covered it in detail below. Read through to learn about the Raspberry Pi Pico pinout, features, and programming using MicroPython.
Contents
- What is a Raspberry Pi Pico?
- What is an RP2040 Microcontroller Chip?
- Raspberry Pi Pico Pinout
- Raspberry Pi Pico Features and Specifications
- Raspberry Pi Pico Programming
- Getting Started with Raspberry Pi Pico using MicroPython on Thonny IDE
- Setting Up The Board
- Setting Up Thonny IDE
- Onboard LED Blinking Program
- External LED Blinking Program
- Onboard and External LED Blinking Program
- Raspberry Pi Pico Limitations
- Raspberry Pi Pico Applications
- Raspberry Pi Pico Projects
- Summary
Special Offer: Get $100 off your order!
Please email [email protected] for details.
What is a Raspberry Pi Pico?
Raspberry is better known for its Pi series of single-board computers, but they made something different in January 2021. They launched the Pico, a small, fast, versatile micro-controller board that allows programming using C, C++, or MicroPython.
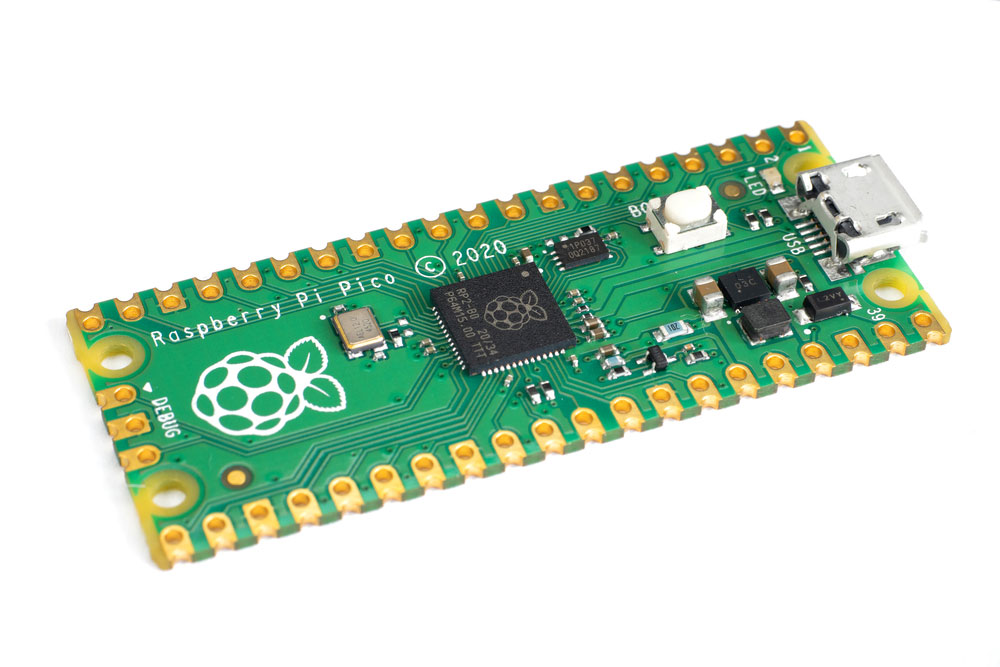
The Raspberry Pi Pico
What is an RP2040 Microcontroller Chip?
The Pico is a carrier board for the RP2040 and owes its quick processing power to the microcontroller chip. This chip features a dual-core ARM Cortex-M0+ processor, which is one of the most energy-efficient processors from ARM. Despite being very quick, the RP2040 microcontroller is affordable, so you get the speed and affordability advantages in one.
RP2040 has some hidden meaning in it, split into five sections. RP stands for Raspberry Pi, while the number two indicates the chip has two cores. Zero signifies the processor type (ARM Cortex-M0+), while the number four indicates it has 264 KB of RAM based on the function floor(log2(RAM/16)). The last zero indicates the board lacks non-volatile storage.
Raspberry Pi Pico Pinout
The Raspberry Pi Pico has 40 pins categorized into power, GND, UART, PWM, SPI (Serial Peripheral Interface), ADC, I2C, system control, debugging, and GPIO pins. Most of them are multipurpose and have the following functions.
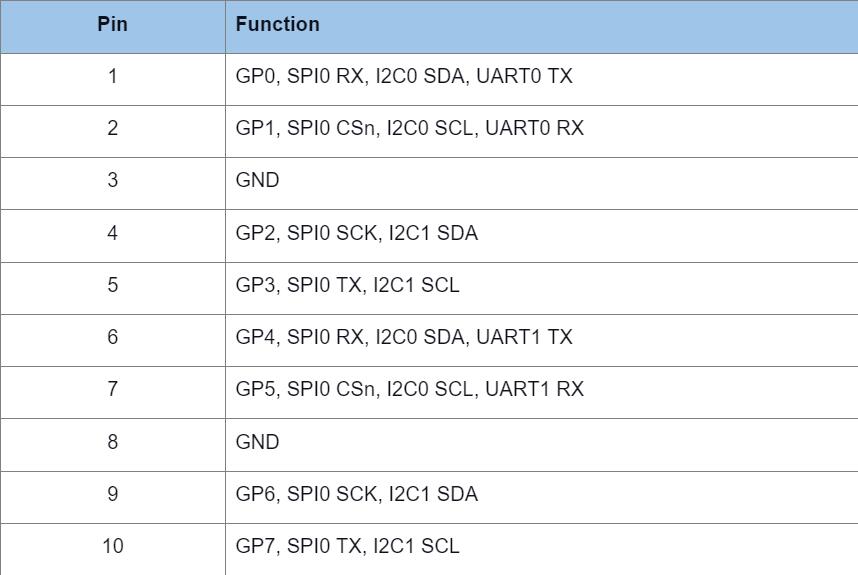
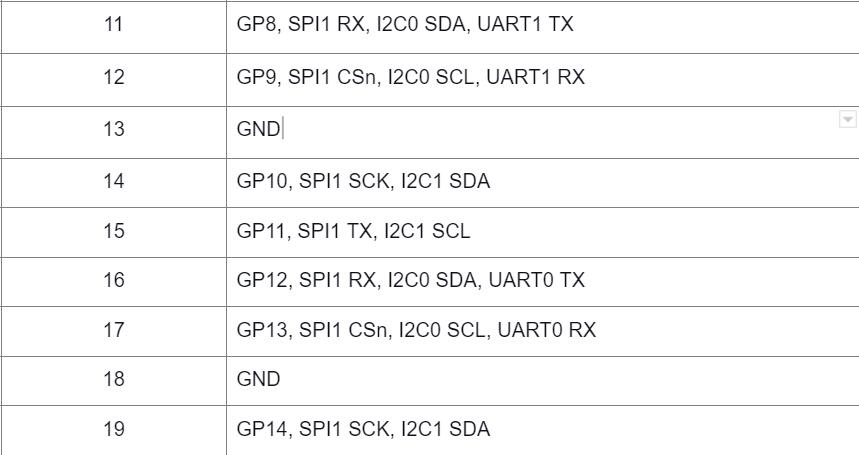
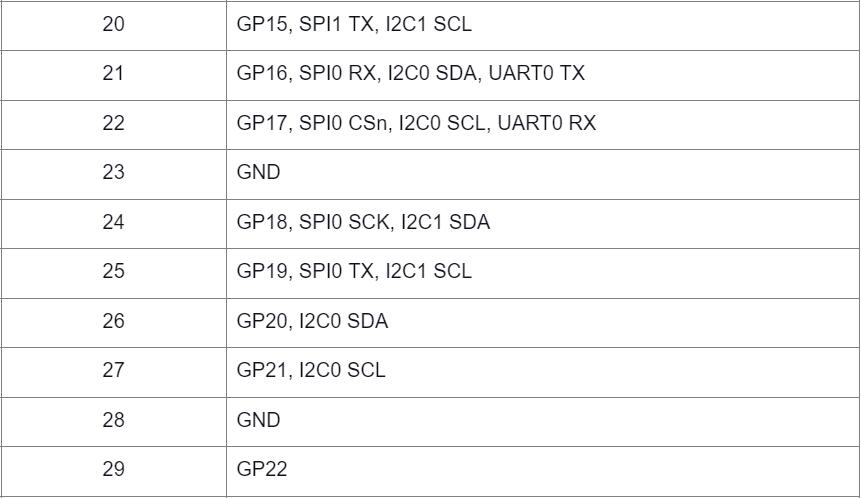
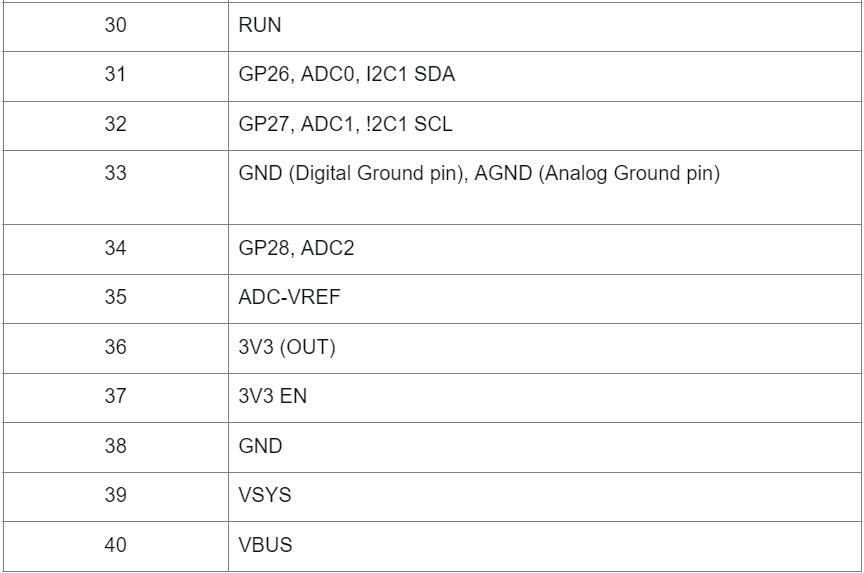
Most of these 40 pins are 26 multi-function GPIO pins and are ideal for internal board functions. In addition to the 40, there are three extra debugging pins (SWCLK, GND, and SWDIO) plus an LED (GP25).
Raspberry Pi Pico Features and Specifications
The microcontroller board has the following features and specifications.
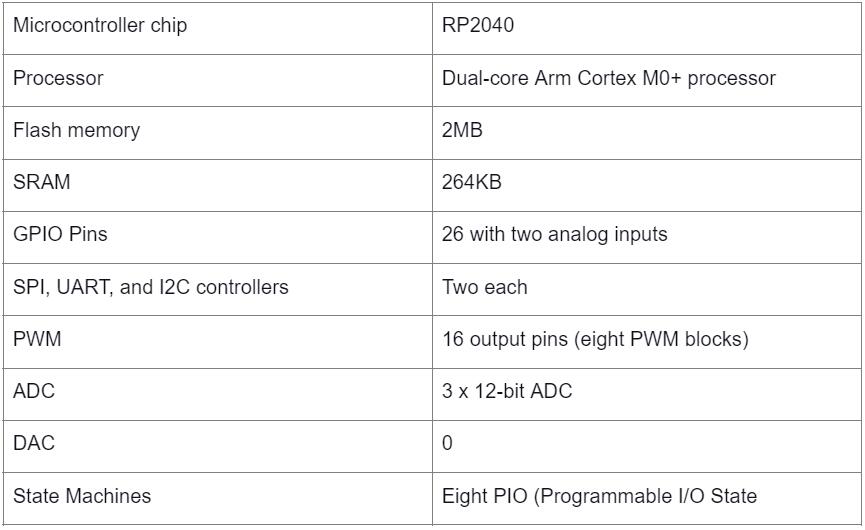
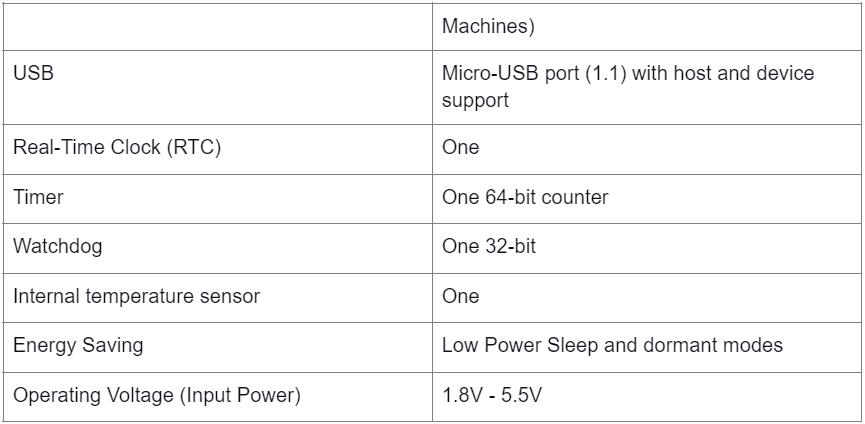
You can check out more of these specifications in the Raspberry Pi Pico datasheet.
Special Offer: Get $100 off your order!
Please email [email protected] for details.
Raspberry Pi Pico Programming
The Raspberry Pi foundation provided two programming options for the Pico board, MicroPython, and C/C++ SDK. Additionally, they have their in-house Pico Python (for MicroPython) and C/C++ SDK.
With these, you can program the microcontroller board using the Arduino or Thonny IDE.
Getting Started with Raspberry Pi Pico using MicroPython on Thonny IDE
We will write a MicroPython program to blink the onboard LED in this section. But first, you must set up the board to program using MicroPython.
Setting Up The Board
Begin by pushing and holding the BOOTSEL button on the board. After that, connect it to your computer via a USB cable.
Open the drives window on your PC, and you should see the RPI-RP2 drive. Release the BOOTSEL button once this drive appears. After that, go to the official Raspberry Pi Documentation page and download the MicroPython UF2 file (on the MicroPython tab).
Copy this file to the RPI-RP2 mass storage drive. The microcontroller should reboot and run MicroPython. After setting up the Pico board, the next step is setting up Thonny IDE.
Setting Up Thonny IDE
First, download the IDE from the official website, install, and run it. Next, connect the Pico board to your computer, then go to Tools > Options and open the interpreter tab. On the dropdown list, click "MicroPython (Raspberry Pi Pico). Leave the port dropdown list to detect the microcontroller automatically, so click OK.
Connect the microcontroller to your computer, and a firmware installation tab will pop up for Raspberry Pi Pico. Click install to download and install the required files automatically.
The microcontroller board and MicroPython version should appear in the Python shell if the process is successful. You can test the setup by typing a simple Hello World program (Print("Hello World")), which should give you a Hello World response.
Onboard LED Blinking Program
The board LED connects to GPIO25, so write the following code while referencing that GPIO pinout.

Save the code on your computer and give the file a unique name. It will run on the Raspberry Pi Pico, and the LED will begin blinking. However, if you disconnect the board and plug it back in, the LED will not blink. Why? Because the code file resides in your computer, not the Pico.
To make the blinking autonomous, you need to save the program on the board. The board has some off-chip flash memory and allows drag-and-drop programming by storage over USB. Give the file a unique same when saving it, and this time around, the LED should continue blinking even after unplugging from the MicroUSB port.
External LED Blinking Program
You should take it a step further and try using the board to blink an external LED.
Required Components
- Raspberry Pi Pico board
- One LED
- Two jumper wires
- A 330-ohm resistor
Connect the components as shown below.

A circuit diagram for connecting an external LED to the Raspberry Pi Pico
Use pin 34 (GPIO28) to power the LED and pin 38 (GND) as the ground reference. All GPIO pins get their power from the internal board 3.3V rail, so their power output is 3.3V.
Code
After that, write the following code and save it to the board.

If successful, the LED should start blinking at intervals of one second.
Onboard and External LED Blinking Program
Leave the circuit as shown above and write the following code on a new tab in the IDE.

Save the code file in the microcontroller board, and each LED should blink at intervals of one second.
While you can use C or C++ in Arduino, Micropython is easier to use and understand due to the simplified syntax. If you are familiar with the Python programming language, MicroPython is a Python Language Interpreter for embedded systems and microcontrollers. Therefore, it will be easy to understand.
Raspberry Pi Pico Limitations
Unlike the ESP8266 or the ESP32, the Raspberry Pi Pico lacks BLE, Bluetooth, or Wi-Fi built-in. Therefore, you need to attach these modules as extras, especially for IoT projects. Such additions might make the board costlier than its competitors. However, it is vital to note that the Raspberry Pi Pico is the relatively new and the first development board in the series. Thus, Raspberry might add these connectivity options and peripherals in the upcoming versions.
Raspberry Pi Pico Applications
The Pico board has the following applications.
- Robotics and automation (including home & industrial automation)
- Virtual reality
- Embedded systems
- GSM-based projects
- Defense systems
- Android applications & Arduino metal detectors
- Real-time face detection
- Medical instruments
Raspberry Pi Pico Projects
Smart homes are a big part of IoT, and you can build a project that controls your lights, humidity sensor, temperature sensor, etc., using the Pico board. For the sensor projects, you need to integrate the DHT11 temperature and humidity sensor with the microcontroller board, then write some MicroPython code to read data from one component to the other.
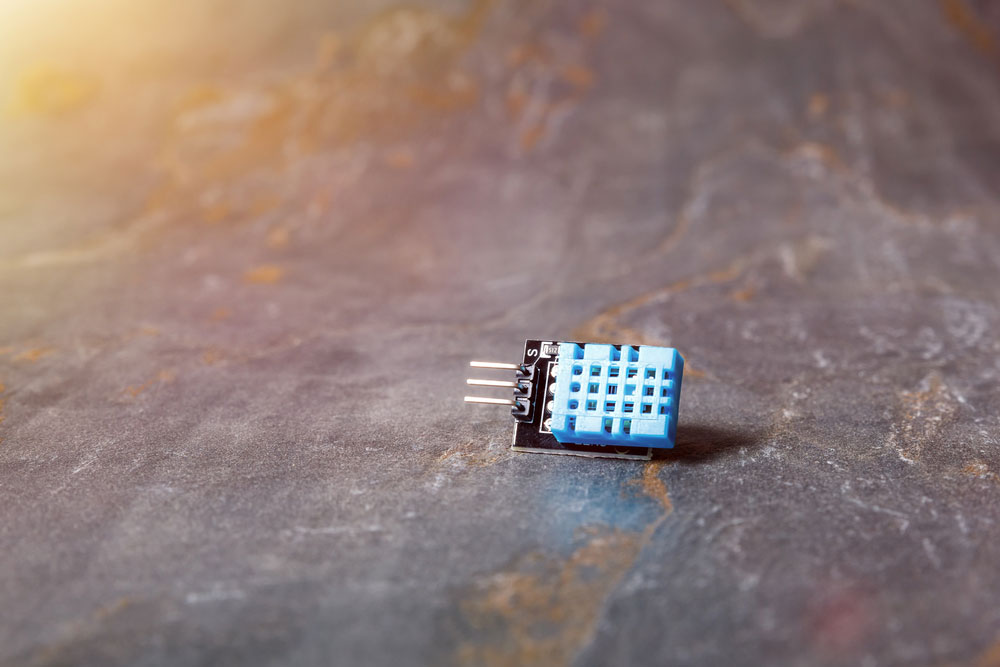
The DHT11 temperature and humidity sensor
Robotics is also a big part of the modern world. If you are thinking of building a toy or fully functional robot, the Raspberry Pi microcontroller board can be of great help. You can work on a fun project to develop battle robots for competitions to see which one is the most destructive.
Summary
In conclusion, the Raspberry Pi Pico introduced a new dynamic in the affordable microcontroller segment, and it has some impressive features with a few limitations. Additionally, it is adaptable to suit different programming languages, skill levels, and projects.
Therefore, you should consider it for your project, and if you have any questions, contact us for more details.
Special Offer: Get $100 off your order!
Please email [email protected] for details.