Motion-tracking/ sensing is crucial in modern electronics because it helps deliver additional real-time inputs for better control. One device that provides this data is the MPU9250. It is an IMU sensor that houses a 9-axis motion-tracking system in a tiny chip plus a few other components on a compact board.
Therefore, if you need a 9-axis motion tracking module for your project, here's all you need to know about the MPU9250 and how to integrate it with Arduino.
Contents
Special Offer: Get $100 off your order!
Please email [email protected] for details.
What is MPU9250?
The MPU9250 is a 9-axis motion tracking sensor module that performs three functions in one. Based on the Micro Electro Mechanical Systems (MEMS) architecture, the device features the following: a 3-Dimensional accelerometer, gyroscope, and magnetometer, making nine axes in total.
It embeds these sensors into a compact integrated circuit, which features 16-bit resolution analog to digital converters.
A gyroscope
In addition to the three, the device features a temperature sensor and an I2C auxiliary interface for data transmission with non-inertial sensors.
MPU9250 Components
The MPU-9250 sensor contains the following five components.
- MPU9250 chip: This chip integrates with the gyroscope, magnetometer & accelerometer sensors, then carries out all the processing functions.
- I/O headers: Provide connectivity and data transmission in and out of the microcontroller unit.
- Pull-up resistors: These resistors source current and establish a default state for the I2C bus.
- LDO: A voltage regulator that lowers the voltage to 3.3V for effective chip functioning while improving energy efficiency.
- Decoupling capacitors: They eliminate unwanted noise from the signals.
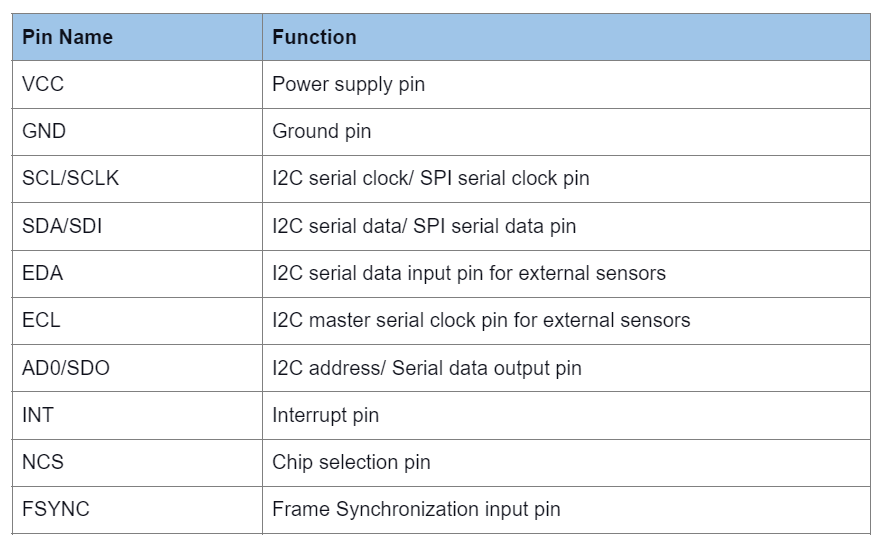
MPU9250 Pinout Configuration
The MPU-9250 sensor has a 10-pin configuration with the following functions.
Special Offer: Get $100 off your order!
Please email [email protected] for details.
MPU-9250 Features (9 Axis IMU)
The MPU-9250 combines three sensors into one, and these are the features of each one.
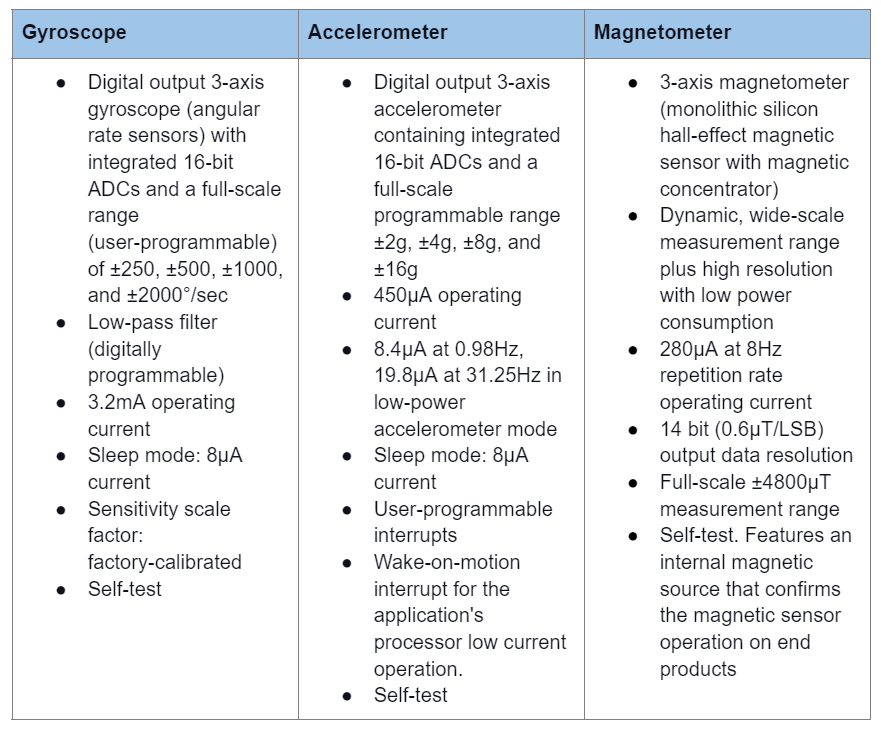
The sensor also has the following board features.
- Smallest, thinnest QFN package (3x3x1mm) for portable devices
- Auxiliary I2C master bus for external sensor data reading
- 400kHz Fast Mode I2C for register communication
- 1MHz serial interface for register communication
- 200MHz serial interface for reading interrupt and sensor registers
- Slight cross-axis sensitivity between the three (gyroscope, accelerometer, and magnetometer axes)
- Digital output temperature sensor
- FIFO buffer (512 bytes). Enables data reading in bursts by the applications processor
- 10,000g shock tolerant
How Does the MPU9250 Accelerometer and Gyroscope Work?
Accelerometer and Gyroscope sensors measure acceleration and rotational changes, respectively. The chip's accelerometer uses microscopic crystals that undergo stress during vibrations, generating an output voltage. On the other hand, the gyroscope uses the Coriolis effect to determine the rate of change of the angular position over time. The two operate similarly to the sensors in the MPU6050, a 6-axis MEMS sensor.
MPU9250 Arduino Guide
Almost every Arduino module supports at least one I2C communication port, so use any. But we will use UNO for this project. You will need the following components.
- MPU9250 IMU sensor
- Arduino UNO
- Jumper wires
- USB cable
- Arduino IDE
Wiring
Make these connections using the jumper wires.
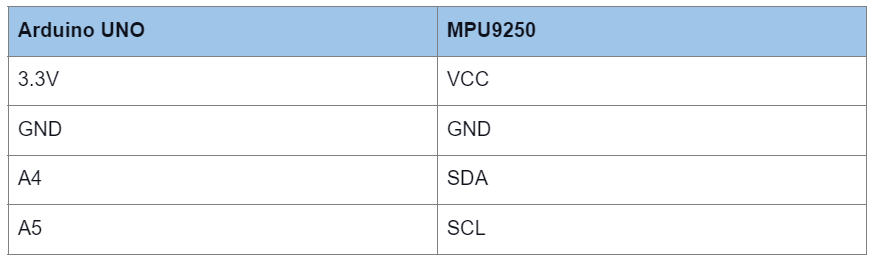

An MPU9250 Arduino wiring diagram
You can connect the SDA and SCL pins to any of Arduino's analog pins for serial data communication because any can do it. Also, use long jumper wires to give you enough room to turn and rotate the sensor module to observe results.
Code
It is easier to use the library written for this sensor module, so download the MPU9250 library first. After that, open Arduino IDE and then import the library (Sketch > Include Library > Add . ZIP Library).
One of the example codes in the library is the following.


Explanation
Start by including the library to interface the MEMS sensor module with Arduino. The module has built-in codes for reading the outputs of the sensors, so including the library will enable this code to read these outputs.
After that, create an IMU object with the I2C's bus address 0x68 as the parameter. It then returns the respective measurements for use in the setup section.
The setup block checks two conditions. After initializing the serial monitor at a baud rate of 115,200, it checks if the monitor launches and displays values. Otherwise, the code stops. Next is the variable "status" declaration to check the IMU object.
After that second condition checks if this status is less than zero (no voltage), then it displays "IMU initialization unsuccessful," "Check IMU wiring or try cycling power," and then the status value on the third line.
Since the status is in a while(1) condition, the code will not go past this point until the status value exceeds zero.
If the status exceeds zero, the code will proceed to the loop section, which reads the IMU's values via the read sensor() function. The first section reads and prints the accelerometer's mG values for all three axes in up to six decimal places.
The second part reads and displays the angle measurement in radians per second, while the third outputs the magnetic field strength in Tesla units.
Remember, the MPU9250 also features a temperature sensor, and the last section reads and outputs this value in °C.
Output
Connect the Arduino board to your computer via the USB cable. Upload the code above, then observe the results. The output should be in this format.

Rotate the MPU9250 module to see the values changing in real-time.
Applications of MPU9250 IMU
You will find this sensor in the following areas.
- Consumer electronics
- Medical systems
- 3D remote controls
- GPS and satellite positioning systems
- Inertial navigation systems
- VR gaming
- Robotics
- Wearable sensors
- Training and sports technology applications
- Joystick controllers
Summary
In conclusion, the MPU9250 is an excellent motion-sensing device that pairs easily with almost all types of microcontrollers. Contact us for more details if you encounter any issues when setting up your project using the module.
Special Offer: Get $100 off your order!
Please email [email protected] for details.