Jetson TX2 is a cutting-edge inventor kit that exposes standard hardware interfaces and capabilities of the developer board. Besides, it comes with design guides and multiple documentation. As we will see, there is so much you can do with this AI supercomputer. Also, we will compare different NVIDIA Jetson and get to know how to configure the Jetson TX2.
Contents
- What is Jetson TX2
- Jetson TX2 Features
- The Jetson TX2 Module
- I/O
- Power Options
- Software
- Buttons
- Jetson TX2 Specifications
- Comparison Between The NVIDIA Jetson AI Modules
- How to Configure the Jetson TX2
- Equipment Required
- Install NVIDIA SDK Controller
- Install Jet Pack
- Install Orbitty BSP
- TX2 Connection
- Use Orbitty Carrier to Flash the TX2
- Working on the TX2
- Summary
Special Offer: Get $100 off your order!
Please email [email protected] for details.
What is Jetson TX2
Jetson TX2 is a 7.5-watt supercomputer on a module and the most power-efficient and fastest embedded AI computing device. Loaded with 59.7GB/s of memory bandwidth and 8GB of LPDDR4 memory, it brings actual edge AI applications networks to edge devices. Established around a 256-core NVIDIA Pascal™-family GPU family, its CPU complex combines a quad-core Arm Cortex-A57 alongside a dual-core NVIDIA Denver 2.0. Jetson TX2 supports NVIDIA Jetpack, a complete SDK that comprises GPU computing, BSP, computer vision, multimedia processing, etc.
Jetson TX2 Features
The Jetson TX2 Module
- 32 GB eMMC 5.1 Flash Storage
- 10/100/1000 BASE-T Ethernet
- 8 GB L128 bit LPDDR4 Memory
- Quad-Core A57 Complex + NVIDIA Denver 2 64-bit CPU
- NVIDIA Pascal™ Architecture GPU
I/O
- GPIOs, I2C, I2S, SPI, CAN*
- Gigabit Ethernet
- M.2 Key E
- Full-Size SD
- PCI-E x4
- USB 3.0 Type-A
- HDMI
- USB 2.0 Micro AB (supports host mode and recovery)
- SATA Data and Power
- Display Expansion Header*
- TTL UART with flow control
- Camera Expansion Header*

Assorted digital storage devices
Power Options
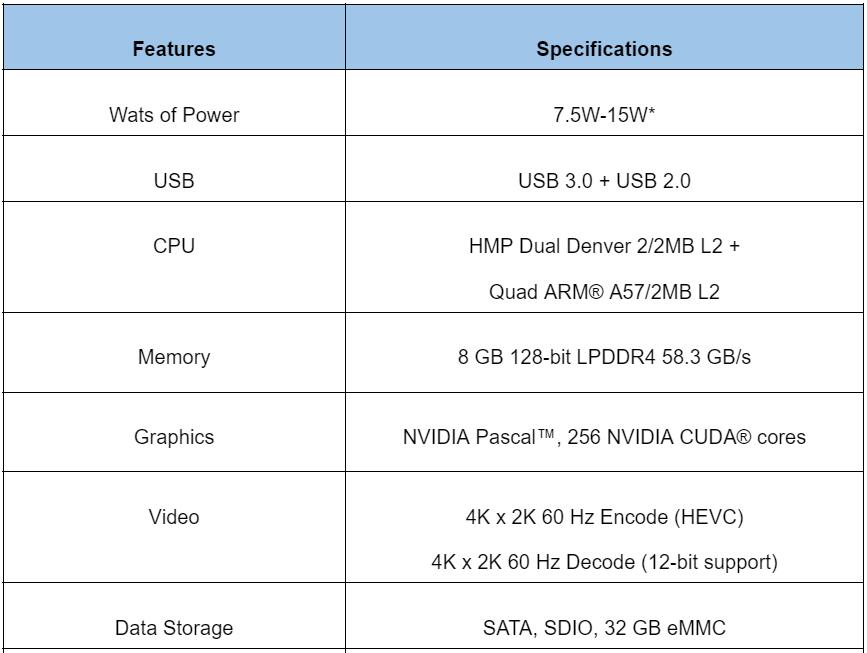
- Maximum power module; 7.5W – 15 W*
- Voltage input: 5.5V-19.6 V DC
- External 19V AC Adapter
Software
- Multimedia, AI, APIs, Graphics libraries, and Compute
- Linux for NVIDIA Tegra*driver package such as Ubuntu-based sample file system
- User-Defined
- Reset
- Force Recovery
- Power mode On/Off
- Camera Module
- 5 MP Fixed MIPI CSI Camera
Special Offer: Get $100 off your order!
Please email [email protected] for details.
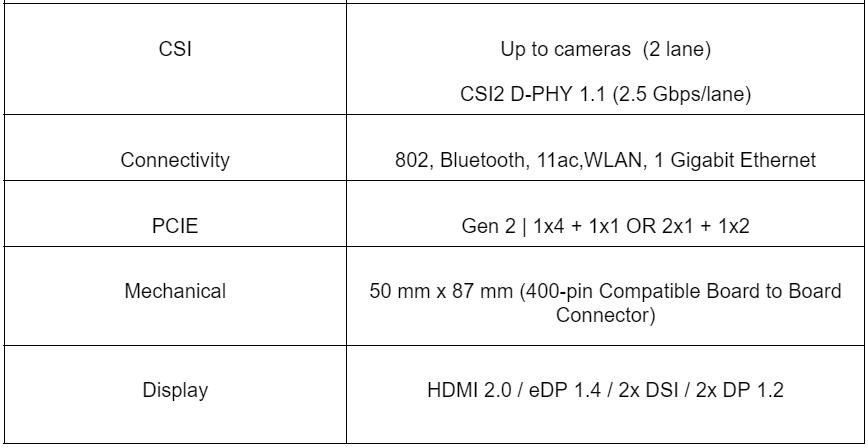
Jetson TX2 Specifications
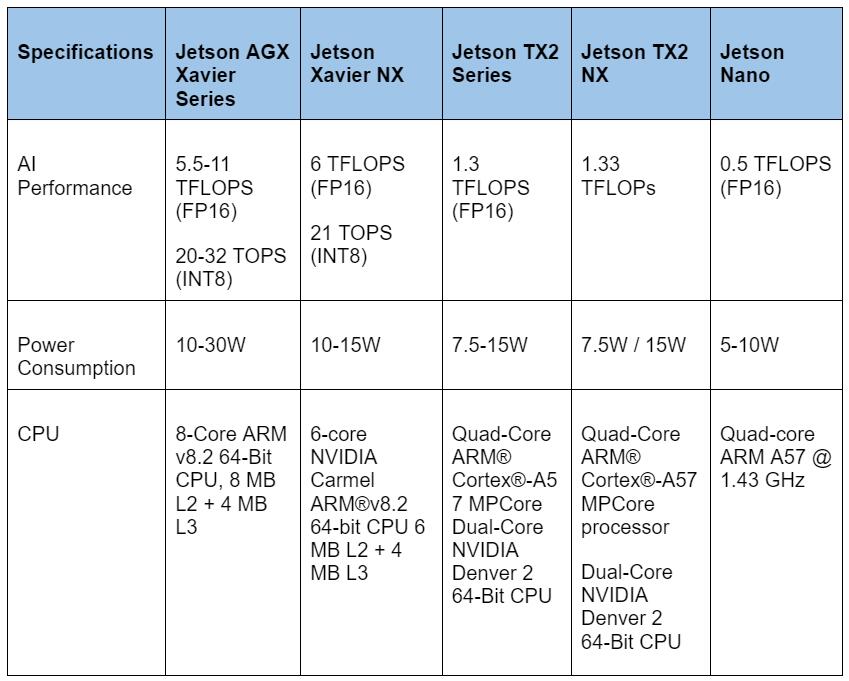
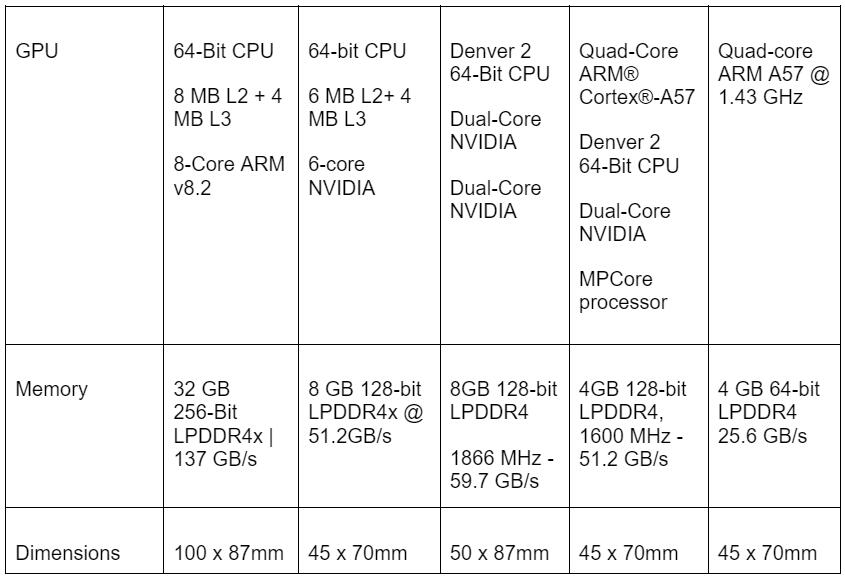
Comparison Between The NVIDIA Jetson AI Modules
How to Configure the Jetson TX2
This project will demonstrate how to set up Jetson TX2.
Equipment Required
- HDMI cable
- Fully built F1TENTH vehicle
- Mouse
- Keyboard
- External monitor
- Host laptop/PC that runs Ubuntu 18.04 or 16.04
HDMI Cable electric plug
Install NVIDIA SDK Controller
First, we begin by installing the NVIDIA SDK controller. Usually, it offers endwise development environment resolution for Jetson SDKs and NVIDIA’s DRIVE for the target devices and host machines.
- a) Search for nvidia.com, then sign up for your personal account
- b) To get “All Jetson TX2 Developer Kit,” install NVIDIA SDK Manager and get SDKM.
- c) Launch and extract SDK Manager on the host computer
Install Jet Pack
- a) When configuring the hardware, choose Jetson TX2 for the Target Hardware base and in the Host Machine
- b) Sometimes, the window may fail to present every detail. Therefore, in such cases, operate with a larger monitor or press a tab and browse downwards to the lower part.
- c) Follow instructions featured within SDKM
In case you notice some errors, close the SDKM and relaunch. Afterward, go to the STEP 4 button, and select uninstall/repair.
Install Orbitty BSP
On the Host/Pit computer, download the BSP for the Orbitty hardware unit and then install it. Next, select theTX2/TX2 4GB/TX2i Jetson series module.
Subsequently, get the very first board series support package. Choose TX2 L4T r32.3.1 – 4.3 Jetpack on the breakout BSP tab.
In the folder, find by extracting the .tgz file. Then, go through the guidelines given and then follow these four steps.
- a) Install SDK manager under
- b) Copy the into
- c) Run commands in the terminal to extricate the BSP or double click it within the right inventory.
- d) Run under in the terminal.
TX2 Connection
You will need to connect four components to the Orbitty hardware unit.
- Power – green 12v terminal block
- A mouse and keyboard attached to USB ports connect to the Orbitty
- A display through the HDMI port (P2)
- The Pit laptop through a micro USB (P8)
Laying out the Orbitty hardware unit.
- Switch S1 toward the left and turn the SYS PWR
- Connect the battery
- Turn on the powerboard
Within the terminal window, you will see the monitor displaying some text.
At this point, you have two set up computers facing each other: the Pit/Host and TX2 PC. Basically, the Pit/Host computer is separate from the keyboard and display computer.

Realistic computer workstation
Use Orbitty Carrier to Flash the TX2
- Allow the Orbitty Jetson and board to be the recovery mode.
- First, long-press the RECOVERY key; afterward, tap the RESET; you will switch off the SYS LED.
- Secondly, you want to ensure that the Orbitty and Jetson are in recovery. Let go of the reset key, pause for a short time, and let go of the recovery key. At the moment, there will be nothing to display on the monitor.
- On the Pit computer, examine whether the TX2 displays on the USB devices. To do this successfully, open the monitor, then type “Lsusb”
- Configure the boards on the Pit/Host computer. Go to the terminal and type;
The flashing will take a few minutes to complete. Once it's done, it will show the following;
Note. The process won't be successful if you have a CTI-aided spark. For instance, it will display;
If there is no sudo, the error message will be;
- On the Orbitty, press the PWR button. Rotate the SYS PWR button (S1) clockwise. The screen will display CTI-L4T on Orbitty.
Working on the TX2
To complete setting up CTI-L4T on the Jetson platform, follow the instructions displayed on the screen. Note that you will have to utilize the mouse and keyboard by connecting them to the storage device port.
Similarly, as we did when installing the Pit/Host layout in the above segment, install ROS as well.
If you feel the process is tedious, install the insertion script and adjust the version. Besides, for the latest Ububtu+ROS versions, you can similarly modify the setup.
Finally, your TX2 should now be operational.
Summary
Jetson TX2 is an AI mainframe on a module. Having the module means bringing AI to the edge, hence unlocking huge potential for devices in the network-constrained setting. Furthermore, it packs all this performance into a power-efficient form perfect for intelligent edge devices such as drones, cameras, etc. This means you can count on accurate and fast inference performance from intelligent cameras and enterprise collaboration to commercial drones and robots.
That’s all about Jetson TX2; if you have any questions, please contact us!
Special Offer: Get $100 off your order!
Please email [email protected] for details.